Android 4.4 KitKat allows developers to do direct screen recordings of their device, allowing you to easily make how-to videos for your application, or to record device issues / bugs. In order to record your device, you need to install the Android SDK on your computer and download the latest updates.
I won’t go through this process as it’s covered in the Android Documentation.
Then, connect your device to your computer and run ADB (see example below, line #2). From the ADB shell, you can run a command to record your screen for a set amount of duration or using a specific bitrate. I’ve included a few examples below:
You can an example of a screen recording on my Google+ page or below, recorded in full HD using the above methods. Remember to watch it in 1080p HD.
You can also enable “Show touches” from the [Developer options] menu in [Settings] so that your touches on the screen come through in the video you record. See the below view for an example:
Further Instructions
To clarify the process of running the process above, here are the summarised steps:
- Install the Android SDK if it hasn’t been already.
- Open up Terminal (Mac) or Command Prompt / MS DOS (Windows)
- Navigate to where the Android SDK was installed (use
cdon Terminal ordiron Command Prompt / MS DOS)
e.g.cd /Developers/android-sdk-macosx/on Mac or:dir c:\android-sdkon MS DOS - ADB is located in a folder called
platform-tools. Move into that directory using thecdordircommand above. - Run the ADB shell by entering
./adb shellinto Terminal / MS DOS- If a device is correctly connected, ADB should enter the shell correctly. Otherwise you’ll see a “Device not connected” error.
- Enter a
screenrecordcommand from above to start a screen recording of your device.
e.g.screenrecord --verbose --time-limit 10 /sdcard/screen.mp4as shown in the video
The video below demonstrates steps 2-5:
Android 10
There is an easier way to enable screen recording on Android 10, as it’s now been built into the UI. However, you still need the Android SDK to enable it. You can run the below command line to enable the screen recording UI.
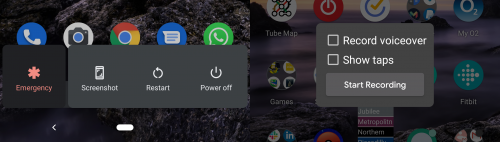
adb shell settings put global settings_screenrecord_long_press trueThe above option will enable the “Screenshot” button from the power menu (down down the power button to see the button). If you press and hold the “Screenshot” button, you will see a new screen recording menu (see below):
What do you do if you open the ADB application and it scrolls down the command prompt then exits?
ADB is a command line tool, it cannot be opened directly. Try passing arguments (like the ones above), instead of opening directly.
Which application do I use to pass the arguments? Sorry it is not quite clear.
Also do you need to root your Nexus 5?
You don’t need to have a rooted phone for this to work. Find where ADB is on your computer and use Terminal / Command Prompt to enter “adb shell”. This will start the adb console. Then, just enter one of the “screenrecord” commands shown above.
I can find the ADB is but when I enter “adb shell” it says that it is not recognised as an internal or external command, operable program or batch file.
As I already said, you need to use “Terminal” or “Command Prompt” (depending on your OS) to run ADB.
Yeah it comes up with “adb shell is not recognised as an internal or external command, operable program or batch file” on command prompt.
You’re not running the command from the correct place it seems. Just for you, I’ve added the new Further Instructions section above with a new video. If you cannot still figure it out, look for more ADB related videos on YouTube.